Description
To the point
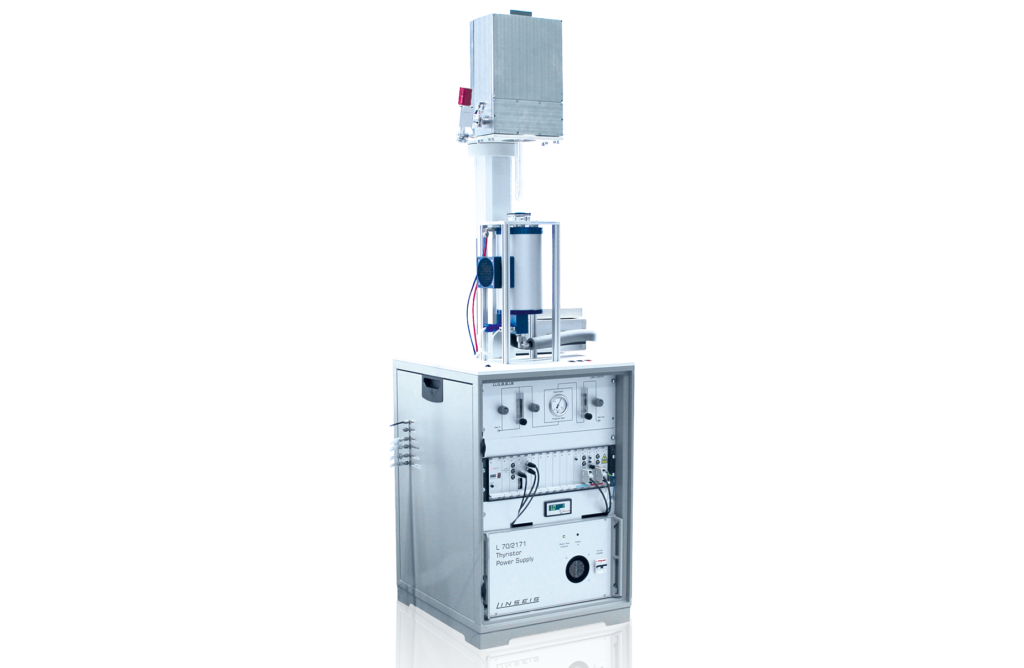
The LINSEIS Laser Dilatometer DIL L75 Laser (DIL L73 Laser) enables expansion measurements with unprecedented accuracy and resolution in the picometer range is available here (0.3 nanometers = 300 picometers). In best case, resolutions that are 33 times better than those of a conventional push rod dilatometer can be achieved.
During development, particular emphasis was placed on the simple handling of the device. This made it possible to ensure operation that corresponds to that of a conventional push rod dilatometer.
The sample preparation for the DIL L75 Laser (DIL L73 Laser)does not require any special preparation. Nor does the device require any special sample geometries. Reflective and non-reflective samples can be measured.
Unique Features
High precision:
laser interferometer for
sub-nanometer resolution
Wide temperature range:
operation from -180°C to 500°C
Extended cooling options:
Air, liquid nitrogen or closed
cooling circuit.
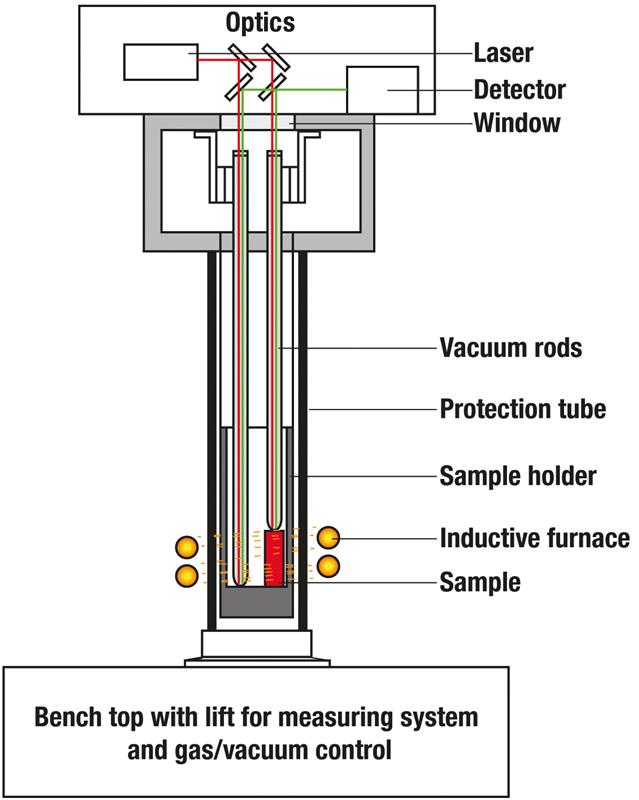
Non-contact measurement:
No disturbance of the sample,
increases precision and reliability.
User-friendly software:
Comprehensive data
analysis and reporting.
Questions? We're just a call away!
+1 (609) 223 2070
+49 (0) 9287/880 0
Our service is available Monday to
Thursday from 8-16 o’clock
and Friday from 8-12 o’clock.
We are here for you!
Specifications
MODEL | DIL L75 Laser (DiL L73 Laser) |
|---|---|
| Temperature range: | -180 bis 500°C; RT … 1000°C |
| Resolution: | 0.3 nm |
| Heating/cooling rates: | 0.01 K/min … 50 K/min |
| Sample holders: | fused silica |
| Sample length: | up to 20 mm |
| Sample diameter: | up to ∅ 7 mm |
| Atmosphere: | inert, oxic., red., vac. |
| Interface: | USB |
| *Specs depend on configurations |
Accessories
- Devices for sample preparation
- Caliper for manual or online input of sample length
- Various gas boxes: manual, semi-automatic and MFC controlled
- Rate-controlled sintering (RCS) software option
- Various rotary and turbomolecular pumps
- LN2 cooling
Software
Making values visible and comparable
The powerful LINSEIS thermal analysis software, which is based on Microsoft® Windows®, performs the most important function in the preparation, execution and evaluation of thermoanalytical experiments, in addition to the hardware used.
With this software package, Linseis offers a comprehensive solution for programming all device-specific settings and control functions, as well as for data storage and evaluation. The package was developed by our in-house software specialists and application experts and has been tried and tested over many years.
Dilatometer functions
- Glass transition and softening point determination
- Automatic softening point switch-off, freely adjustable (system protection)
- Display of absolute or relative shrinkage or expansion
- Display and calculation of technical / physical expansion coefficients
- Rate-controlled sintering (software option)
- Sintering process evaluation
- Density determination
- Automatic evaluation routines
- System correction (temperature, zero curve, etc.)
- Automatic zero point adjustment
- Automatic punch contact pressure control
General functions
- Real-time color display
- Automatic and manual scaling
- Display of axes freely selectable (e.g. temperature (x-axis) versus delta L (y-axis))
- Mathematical calculations (e.g. first and second derivative)
- Storage of complete evaluations
- Multitasking function
- Multi-user function
- Zoom option for different curve sections
- Any number of curves can be loaded on top of each other for comparison
- Online help menu
- Free labeling
- EXCEL® and ASCII export of measurement data
- Data smoothing
- Zero curves are calculated
- Cursor function
- Statistical curve evaluation (mean value curve with confidence interval)
- Tabular printout of data and expansion coefficients
- Calculation of Alpha Phys, Alpha Tech, relative expansion L/L0
- Curve arithmetic, addition, subtraction, multiplication
Applications
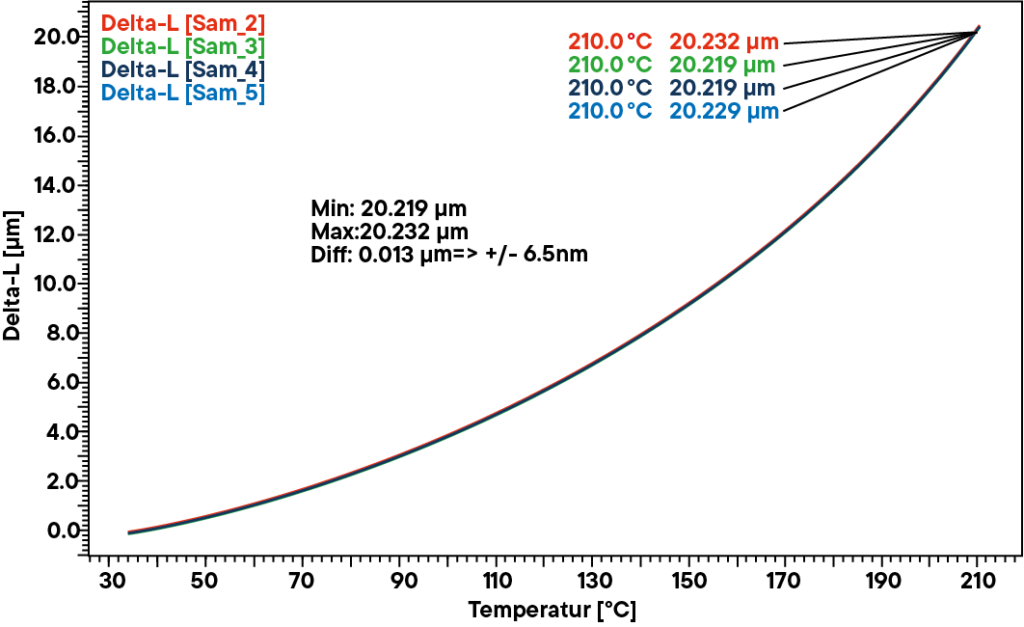
Application example: Invar dilatometer measurement
An Invar sample was measured and evaluated four times from room temperature to 210°C in air. The reproducibility was determined by comparing the four runs on the laser dilatometer. A reproducibility of 0.01 % of the measuring range was achieved as can be seen in the graphics on the right. The reproducibility was found to be 33 times higher when using the laser dilatometer instead of classical push rod dilatometer. A further advantage is that the laser dilatometer delivers an absolut readout of expansion values and no correction is necessary.
Well informed
